to bolt a climbing route
Do you want to bolt a climbing route? Then bolting.eu is the right place for you. In our technical article you will find all the information you need to set up a climbing route.
You can also download a checklist to help you set up your route professionally.
Bolting a climbing route – preparations
From years of experience, we can only give you one tip. Prepare a bolting day properly! Good planning and preparation saves time, energy and a lot of hassle. Pack everything together and make sure your gear is complete!
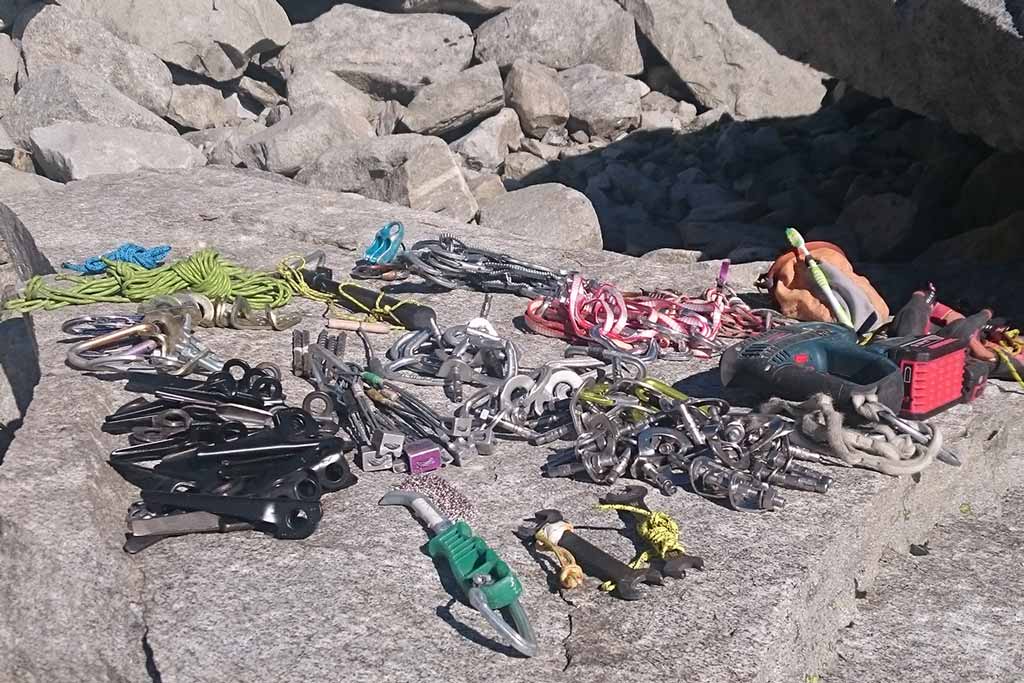
The most important materials are listed below:
- Fully charged batteries and drill
- At least 3 drill bits with the correct diameter
- single-variety expansion bolt and bolt hanger
- single-variety lower off with expansion bolt
- Rock hammer and wrench
- Snacks and drinks
- PPE: helmet, safety goggles, breathing protection, gloves, rope protection
- Cleaning tools: wire brushes and hand brushes
- Accessories: material bags, cliffs, nuts, small cams, additional carabiners
- remaining climbing equipment
Bolting a climbing route – the steps
It is quite difficult to describe a standard process for drilling a route. On the one hand, every rock is different. On the other hand, the general conditions are also different. For example, an experienced developer will set up the fixed points while rappelling. In addition, a route is sometimes first climbed from below.
Consequently, we have described a process based on the following assumptions. Firstly, bolting in a rope team. Secondly, that there is enough time. Thirdly, that a lower off is installed first and the route is checked out in the top rope.
to bolt a climbing route
- lower off set up
Bolting a climbing route in the climbing area begins with a lower off.
If you are rappelling down the wall on a fixed rope, please be aware of this:
– Secure the fixed rope redundantly
– Use rope protection on the rock edge
If neighboring routes are available. Simply follow the route from there to the location of the planned lower off rappelling.
The following must then be observed when attaching the lower off:
– connect the two fixed points of the lower off in series
– the chain between the fixed points of the lower off should sag slightly (not taut!)
– the lower off carabiner should protrude at right angles at the lower fixed point (use Rapid link if necessary!) and hang “freely” in the air
– avoid at all costs running the rope over edges or scales before the lower off.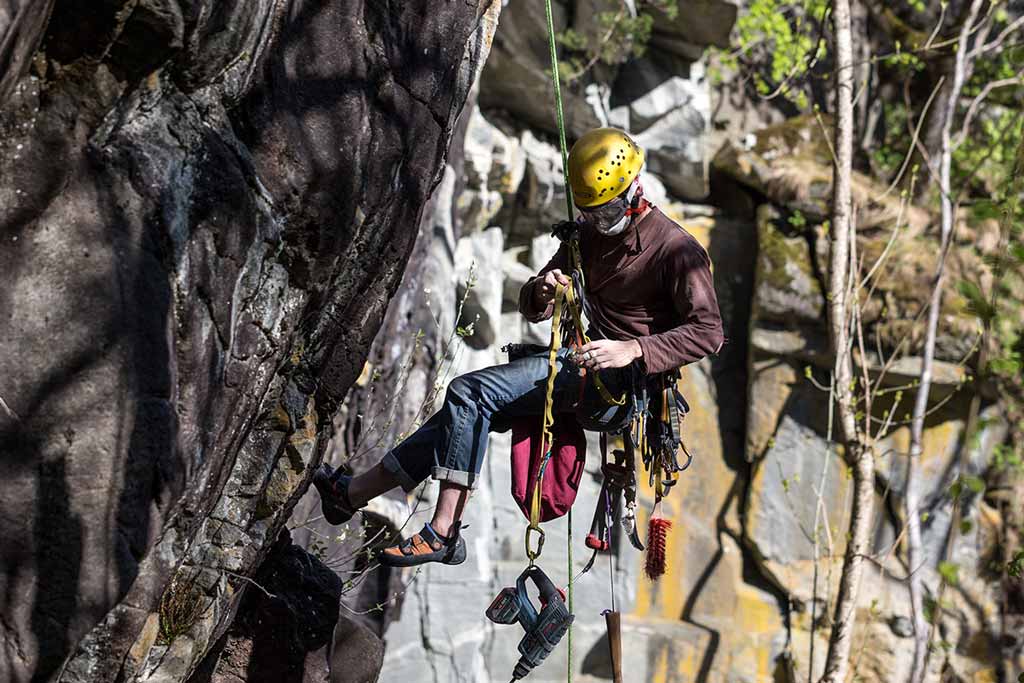
- Climbing route bouldering and route cleaning
When bolting a climbing route, take enough time to boulder out your planned line in the toprope.
This is the best way to find out what the ideal route should look like. Ideal means choosing the easiest line. After all, this is the line that repeaters will climb later on.
Forcing lines around “defined” solutions usually makes no sense at all!
As a rule, new climbing routes are also cleaned properly when bouldering out. If the line is very dirty, you may have to put a lot of effort into cleaning the rock before bouldering out for the first time. Setting up a climbing route can therefore mean a lot of work. - Define clip positions
Once the lines are clear, the clip positions should be defined.
The best clipping positions are so-called “stable” positions. This means positions in the climbing route where you can safely clip the rope into the bolt thanks to good holds and footholds or a “solid” body position.
There are two critical areas when bolting a climbing route. Firstly, the start. Secondly, all types of ledges and ledges.
Use a higher bolt density at the start of the route and above ledges / ledges. This helps to avoid ground falls or falls onto ledges.
In general, the following practice applies when setting up climbing routes. On the one hand, more bolts are set over the entire climbing route in easier routes. Consequently, fewer bolts are set on average in difficult routes. This means that easy routes are better secured!
The position of the hooks is automatically determined by the clip position found.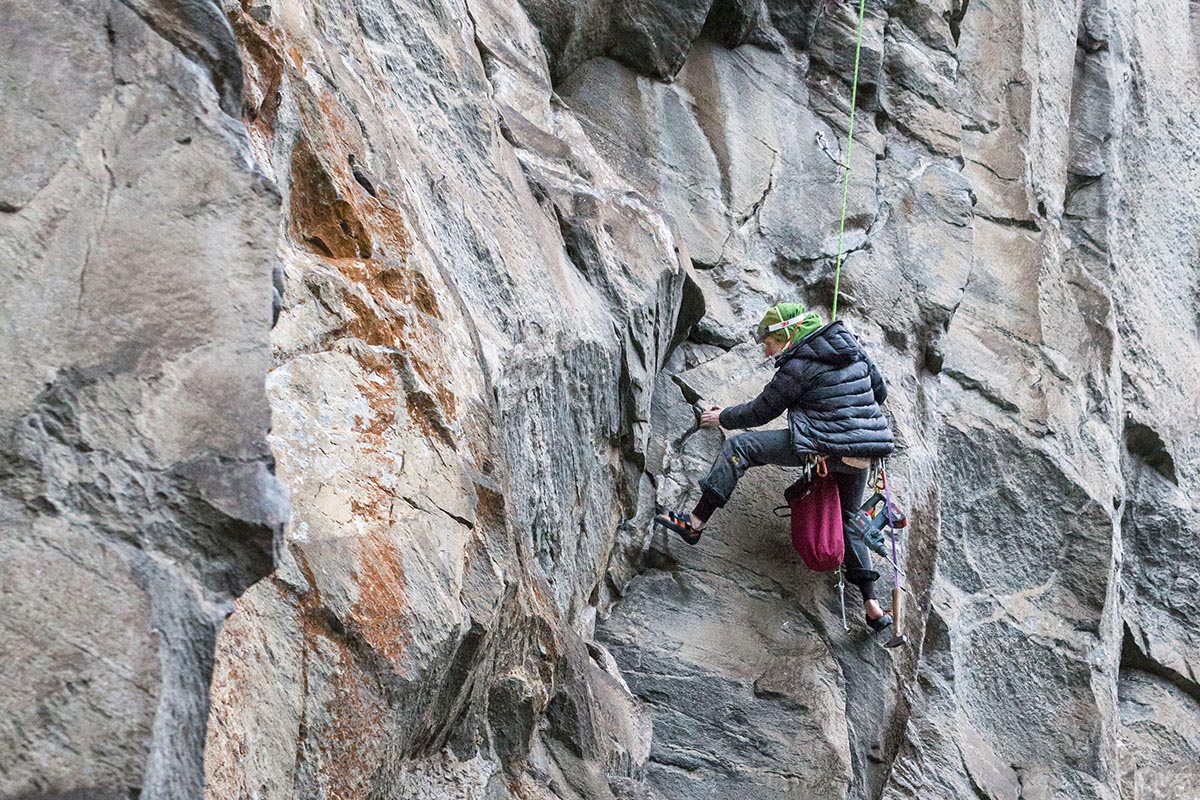
- Hook Mark positions
Once you have defined the clip position, you should determine the exact position of the hook. This should be done using the “5 point check”. This is one of the most important steps when bolting a climbing route and should be done with the utmost precision:
– 1st elbow check: Can a small person reach the hook? As a man, check whether you can reach with your elbow!
– 2nd quickdraw check: Is there a carabiner on the side of the rock cross-loading? Is there a cross-loading on the side of the rope? Does the carabiner on the side of the rope rest exactly on the edge of the roof? Check this by placing both a short and a long quickdraw on the rock where the hook should go!
– 3. grip and foothold check: Am I obstructing my grip or foothold with the clipped quickdraw or the attached rope? You should avoid this at all costs!
– 4. rope course check: Is the hook in a straight line with the other hooks or in an even curve? Prevent a “zig-zag” in the course of the rope at all costs. When it comes to “setting up a perfect climbing route”, the following applies: the rope route must fit!
– 5th hammer test: Tap the desired spot with the rock hammer. Does the rock sound hollow? Only set pitons in solid rock. You may have to attach an extension to the solid rock surface to be able to clip in the desired place!
Mark the finally defined hook positions with a chalk dot.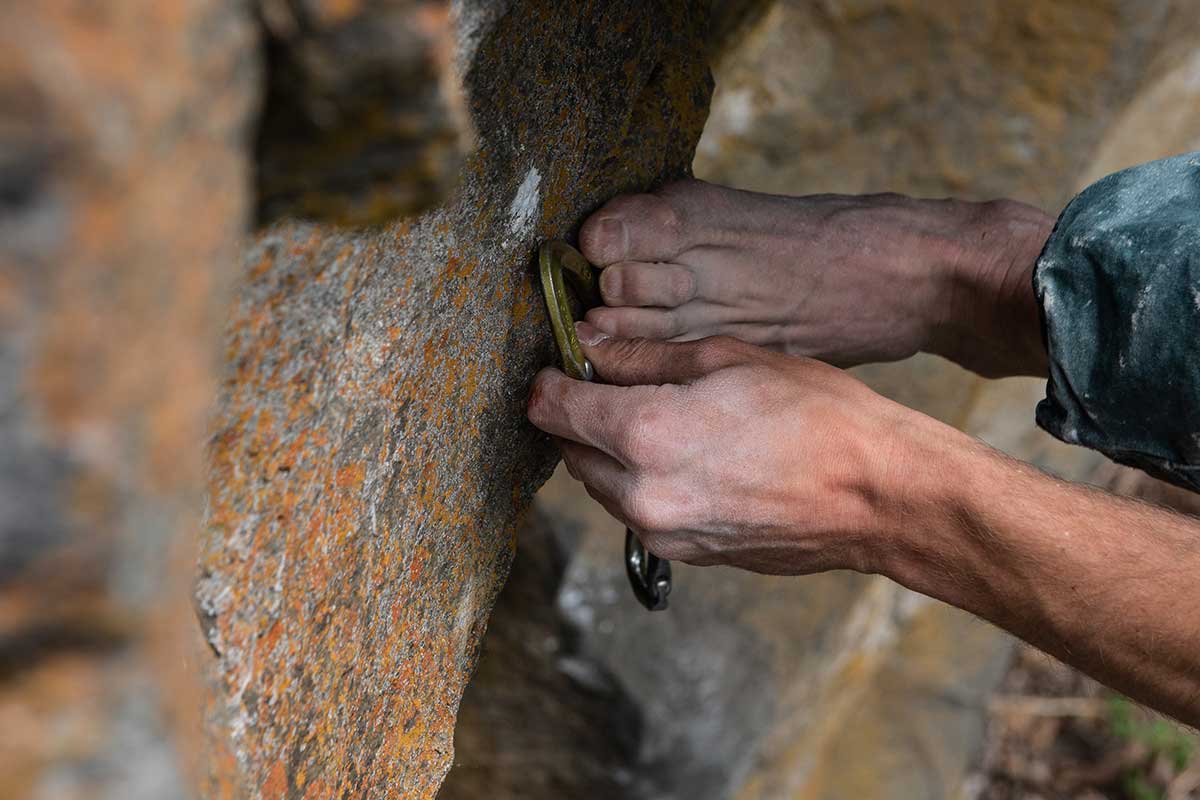
- Bolting the actual climbing route – setting pitons
First mark the drilling depth on the drill bit with tape.
The drilling depth when setting up a climbing route depends on the type of hook:
– expansion bolt: Hook length + 0.5 cm. The expansion bolt must be able to be fully countersunk!
– glue in bolt: Shank length + 2 cm. “Overdrill” the hole deliberately. This guarantees that the glue in bolt does not protrude from the wall. Even if you make the “channel” for countersinking the carabiner eyelet on the side of the rock a little more generous.
Drill the holes marked accordingly. Clean the drilling hole with a blow out pumb or a hole brush. Carry out at least two cleaning processes at glue in bolt.
When bolting a climbing route, you must tighten the expansion bolt to the appropriate torque. In other words, do not overtighten!
When using glue in bolt, process the injection mortar cleanly. Firstly, throw away the “pre-run” (the first approx. 5 cm of adhesive that flows out of the static mixer). Secondly, push in the glue in bolt while turning it slightly. Thirdly, smear the oozing glue properly. This means you must close the drilling hole completely.
Practical tip – set up the climbing route: Always take spare bolts, spare batteries and spare pitons with you on the wall. This way you don’t have to go back to the ground if a drill breaks, a battery fails or material falls down! - Final theses
Once the route is finished for the first time, the following usually remains to be done:
– clean again and, if necessary, prepare the base of the wall
– test climb
– if hook positions are not successful: if necessary, attach extensions to the hooks or re-drill hooks
– make an assessment suggestion
– give the route a name
– mark it locally if necessary
Checklist
Below you can download a checklist for setting up a climbing route.
This is intended to help you with your practical work. Firstly, so that you have all the materials together. Secondly, so that you can keep an eye on all the important safety aspects. Thirdly, so that you can work quickly and effectively. And fourthly, so that the result is technically good. In short: so that you can do it really well!
Suitable bolting materials
Below you will find a list of the materials required to set up a climbing route.
- expansion bolt
- bolt hanger
- glue in bolt
- injection mortar
- lower off / Climbing anchors
- Screw links / Rapid links
- SDS drill bit
- Rock hammer
- Boulder brushes / wire brushes
- Bolting accessories
Bolting PSA
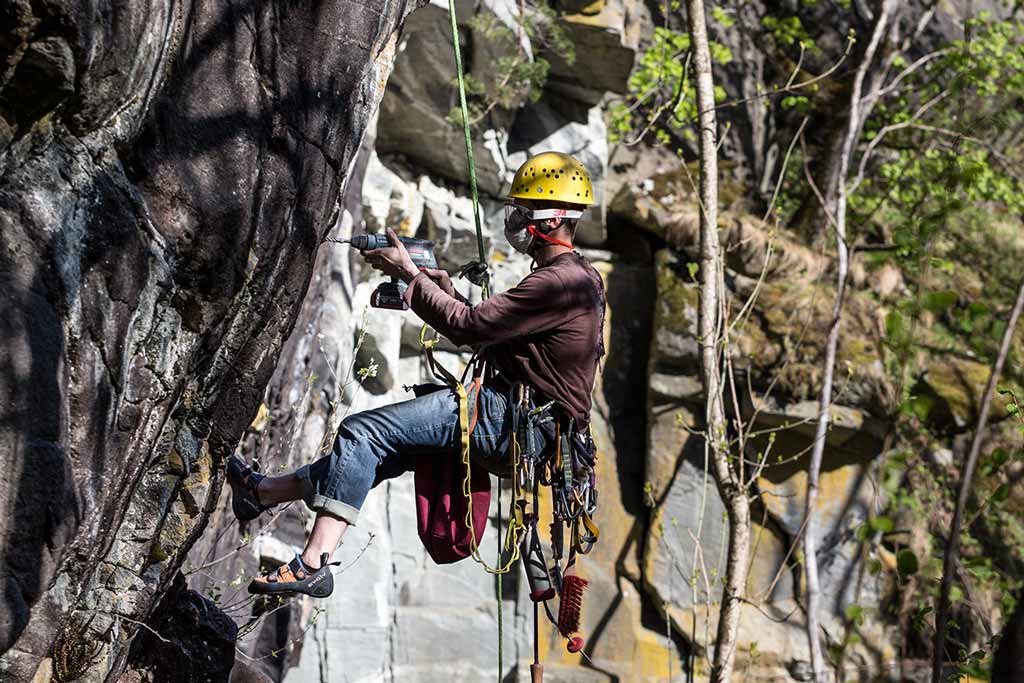
We recommend using the following PPE (personal protective equipment) when bolting a climbing route:
- Climbing helmet
- Safety goggles: When “drilling”, small pieces of rock can get into the eye. When using injection mortar, this corrosive substance can also get into the eyes. The goggles also protect against all kinds of dirt when cleaning rocks. E.g. sand, lichen particles, moss,…
- Respiratory protection: Drilling dust is poison for the lungs! Protect yourself from the dust with a breathing mask.
- Gloves: Anyone who has ever worked with injection mortar and without knows this. The hardened mortar sticks under the fingernails. It also sticks to the hair on your fingers and the back of your hand. Scraping away the mortar is really painful. Therefore: use gloves!
More articles on the topic of bolting a climbing route
We have some more interesting articles on the topic of ” Bolting a climbing route” for you in our Bolting Know How section:
- Set up a climbing route with expansion bolt
- Set up a climbing route with glue in bolt
- Galvanic corrosion for drill hooks
- Bolting near the sea
Link tip: You can find numerous other tips on bolting in the “Climbing area” manual.
Bolting.eu Academy
Do you want to learn how to set up a climbing route under professional conditions? Then our 2 1/2 day bolting course might be the right thing for you.
Or are you and your organization interested in deepening your knowledge? We offer fire departments, alpine clubs, the army, alpine police and mountain rescuers a 3-hour bolting workshop.